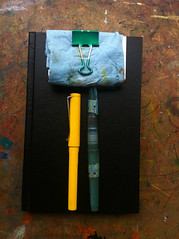
So...attempting once again to organize and simplify! I have just gotten 3 new/old vintage pens from Pier Gustafson (more on those soon!) and wanted something better to protect them than the old plastic pocket protector that I've been using for years--you know, the ones with the open top. Things kept falling out, and it really wasn't quite big enough--not with the delicious new pens to play with.
Unfortunately, all the closed pen cases I found were too small, only holding 2 or at most 3 pens...and of course when I saw this small Smart Fit case from Jetpens, I decided to give it a try. It's about 4" x 7", and zips shut for much more security.
The problem, of course, is that it really holds TOO much--and not quite enough at the same time! Consolidating all my travel kit in one place is lovely, but...it's gotten kind of fat and heavy as I keep thinking "okay, I need that...and might use that...and I always wish I had one of those...and oh, look, that fits right there...and want to try that out..."
As it turned out, the pens work best on the right side, and I knew I wanted to keep one technical pen and one mechanical pencil, in addition to two of my vintage pens, and a dependable TWSBI Eco, and my old Frankenpen I discussed in this post, and this post and OOOPS, out of room on that side!
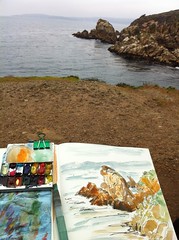
So here's what made the cut for now...plus the tiny kids' watercolor kit from Wet Paint I filled with my own choice of artist colors and a wee telescoping brush from an old Winsor & Newton kit in that small front pocket...that's the new/old blue Waterman from Pier Gustafson and my old red Eversharp from the 1950s.
The mesh side has room for a sharpener and a small magnifying glass, plus two waterbrushes, two "real" brushes of a nice size, cut off to travel, and one wee tiny one for the occasional serious detail (cat whiskers anyone?), 3 colored pencils (2 black or grey and one white), an antique folding pen given to me by a friend (that's the aqua dealie), and yes, another pen, the ever-dependable fine-nib Carbon Desk Pen I cut off so the cap would post. You can read about that process here.
This is how they come from Wet Paint and others, still with the kid colors in it at that point...and a totally useless brush!
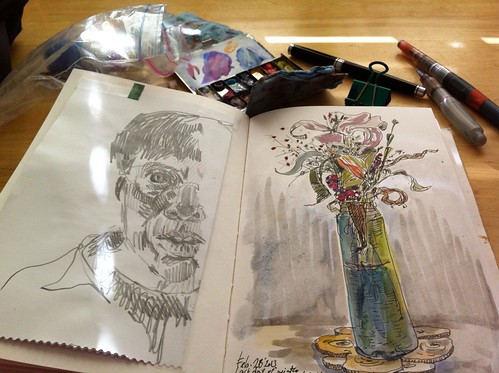
Oh, yeah, that tiny watercolor kit? That's what I used for all the sketches but ONE to fill this journal when we went to Charleston, SC! (If you're not on Facebook, my account is public so you may be able to see anyway...) I CAN travel light...it's just not easy.
So at 7.7 ounces this setup is not exactly super light, and full, it's about 1-1/2" deep, so not really skinny, either...but oh well! Like a Boy Scout, I'm prepared!
Last year I took my vintage Prang box, refit with my own choice of tube watercolors in pans, to Mustang Island, camping with the family. With it being so exceptionally windy and the sandy beach so fine, my paint box was literally sand-blasted -- a real mess! Not sure what to do with it, I set it aside.
This month, I finally took the paint pans out, cleaning them as best as I could with damp paper towels; most of the paint was still good. Then I sanded the inside surfaces with the fine-grade sandpaper that came on my pencil-sharpening block.
I taped off the black edges with masking tape to keep them black. The black finish was worn with age even before the beach trip.
After several thin layers of white enamel spray paint, the inside is clean and ready to go. Pans were set in place with a dab of rubber cement, leaving room for a blue-gray watercolor pencil and a #7 round sable travel brush.
My tweaked color choices:
permanent rose, pyrrole scarlet
quinacridone gold, Hansa yellow light
sap green
cerulean chromium blue, ultramarine blue
yellow ochre, burnt sienna, raw umber
mixed gray (ultramarine and burnt umber, stirred together)
I
still have one more un-used hand-bound journal on my shelf, but this
time I decided to use this Epsilon sketchbook from Stillman & Birn that a dear friend gave to me. The paper is made more for ink than
watercolor, but light not-too-juicy washes work well on it. And my
fountain pens simply glide over the smooth paper! Every one of Stillman & Brin products are a dream to use, and the binding lasts no matter how rough I get with it.
As
always, I drew my current sketching palette on the first page.
Actually, this is the second 2-page spread -- I left the inside covers
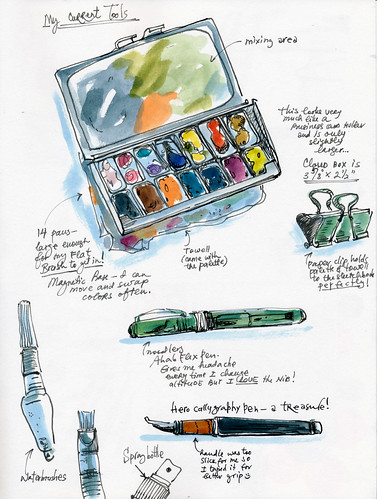
blank for collecting random quotes. Lately I have been carrying a larger
purse than my norm, allowing me to carry a full-size sketchbook and
this pocket art toolkit from Expeditionary Art inside the bag. Smaller bags only hold my tools and I carry the book separately. In the kit are two fountain pens (one with water-resistant ink and one with water-soluble ink), a waterbrush, two travel brushes (a #8 round and a dagger),
a mechanical pencil and tiny case holding a kneaded eraser, a tiny
stencil brush for spattering, a shortened white pencil, a shortened
blue-gray watercolor pencil, a re-usable towel for wiping, and two
pocket palettes, also from Expeditionary Art. I can switch out either of
these palettes with a third one: one holds a basic warm/cool limited
palette, one holds granulating earth colors, and one holds gouache. Not
shown is a 4th set I made myself using a business card case that holds a
basic palette of 14 paints.
Just after putting together my pocket palette set of granulating earth colors, Jane Blundell posted one she put together
. . . so I had a bit of fun comparing our sets side-by-side. I have a
set of Daniel Smith color dots that I used for the colors she uses that I
don't own. She also recently put together a set for urban sketching along with some suggested options, so I added that just for fun.
...this is what I posted on my Cathy Johnson Art page on Facebook yesterday. Guess we're all thinking about this!
This is my vintage Waterman 52 nib I took out of a beater that was just good for parts, and put into a Noodler's Creaper body...fun, and a new favorite!
---------------
Even at my age, this late in the game, I'm still searching for tools that let me do what I want with my art.
Granted, there IS no magic brush (though I found one that came close,
once, and wore it OUT!), but have you noticed how often we find something that just feels GOOD? That works for us?
My favorite travel palette is my old re-purposed Prang box...I carry
one in my bag and one lives at the shed/studio. I seem to reach for it
over any of my others, and I believe in part it's BECAUSE it's fun. It
reminds me of creating for the sake of creating. Not for sale, not to
illustrate anything, but simply because I love doing it.
My
favorite fountain pens need to be dependable, smooth, and have some
flex. Some have all those attributes, some only two, but I keep trying
out new and vintage ones--the ones you see on my eBay listings are good
pens, but may either duplicate one I have, or just don't flex enough for
me!
I prefer real watercolor brushes (currently,
Loew-Cornell and--yes!--Utrecht's inexpensive sets are my favorites),
but since I DO work in my journal 90% of the time, and work on the spot
frequently, I use waterbrushes a lot. At this writing, a couple of
Aquash ones in the largest size are what I usually reach for.
After exploring MANY brands of colored pencils, I'm back to
Prismacolors...I normally use a single dark pencil, with watercolor
washes, and Prismacolors do the job for me. They don't smear, they
don't lift under washes, but they're soft enough to put down a good dark
value without hurting my hands! I've tried several of the newer
oil-based pencils that many artists just love...but they're not for me,
or the way I work.
I still love Fabriano watercolor paper,
though I try to find the soft press now...they changed the surface of
the CP and it's just too bumpy for me. Despite the fact that Arches has
to be THE most popular watercolor paper among the artists I know, it's
not for me. (Except the HP version, which is fine. Go figure.)
I have to admit, though, that exploring and continuing to experiment is
a never-ending joy to me. It's exciting when I find something that
just fits the way I work. Doesn't mean it's Right, or right for
everyone, only that it suits me...at the time!
I've been using a new palette lately and now like it enough to show and tell a bit about it :)
I'm always looking for a way to make my palette lighter, smaller and more flexible plus I enjoy playing with different set-ups of colors. After my Alaska adventure my friend mentioned an interesting artist and avid outdoor sketcher - Maria Coryell-Martin whose work is entwined with Alaska. I looked through her we-site and blog and really liked her palette shown on one of the photos and thought that I should write and ask a few question.
A few days later I realized that it would be very useful to have watercolor pans attached with magnets as I'd like to try changing colors and their position in my watercolor kit. I googled magnetic watercolor pans and... I was back at Maria's web-site!
Impatient me probably was looking at pictures, reading every other line in the best case - but now I noticed that she is selling these palettes :)
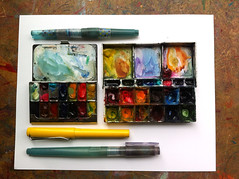
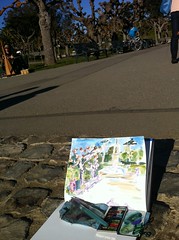
Below are some photos of my new set-up in action. In short - it's working great for me!
What I like most?
First - it's tiny! (photo above compares size of this credit card holder with my trusty Cotman Sketcher's Pocket Box.
Second - it clips very nicely to my sketchbook (this is 8.5 x 11 Alpha series Stillman&Birn - love them!). The cover of the kit and kit itself are so thin that I can close a book if I need to move or rush somewhere and have no time to pack.
Third - I can move my colors and add/exchange on the go. I like that pans are rather shallow so I can add fresh colors often.
Last but not least - pans are large enough for my flat brush to get in. I am showing flat Niji waterbrush on the photo below because many of you are familiar with it's size but I've been using my 1" with this kit happily!
And palette came with a nice little towel - which soaks up incredible amounts of water.
I get asked about this, occasionally--and just recently on the free Strathmore class I'm teaching, so I thought I'd do a dual-duty post!
Some artists like to squeeze out fresh tube paints every time they work--I've always been sort of the frugal type, and prefer to re-wet my colors till they're all gone, whether in my studio--on my big beloved old John Pike Standard Palette!--or in my traveling watercolor boxes. I've re-wet paints that have been on that palette for 15 years, with no problem...
You can buy paint in pans, of course (though it's much easier to find half pans than full, no idea why) but it's a piece of cake to make your own. I love my old standby, Winsor & Newton.
It’s really easy to do, and have the colors you want in your paint box, as well as to refill them any time they get low...I believe it’s even a bit less expensive, too.
I was told by one company that their tube paints weren’t meant to be used this way, they weren’t formulated to re-wet as the commercial pan colors are, but I say “nonsense!” I’ve been doing it for 40 years...
DO spray or drip water on your pans of paint a bit before you're ready to work...it makes all the difference, as you can see below!
Click to find this illustration here to see what a different spritzing a minute or two before you're ready to paint can MAKE in how rich your colors are. I list all the color names there...
That said, some colors or brands DO re-wet more readily than others. Horadam Schmincke works well, as does Daniel Smith...but as I say, I’ve used Winsor & Newton for decades and they work beautifully for me. They're still my go-to brand for most colors.
(Lovely as M. Graham paints are, they tend NOT to set up well under some conditions, since they use honey as a binder. They may run or “drool” for you...)
So what's next...
If your palette box already has divisions, like the little one above, you just squeeze however much paint into each one that you want...fill them all the way, just put a dab, or fill halfway, it’s up to you. (If it’s a paint I use often, I tend to fill it up.)
You can also buy empty half or full pans, made of plastic. They’ll either fit directly into your palette divisions, as in some of the older style of metal watercolor boxes, or you can stick them down with rubber cement, so you can re-position them. Most palettes will allow you to use a combination of full and half pans, if you like...I use half pans for those colors I use less often, or that I want to experiment with before making permanent additions to my repertoire!
This is my ancient Winsor & Newton dinosaur, being rehabbed now to remove the rust! I've used it for decades, and it's traveled all over the country. You can see it will take full or half pans held in place by bent metal strips.
(The most difficult thing is figuring out how they’re listed on the site! “Empty full pans” sounds weird...)
I've learned it may work best to start in the corners first and then fill the middle...and be aware, the paint will shrink as it dries. You may wish to fill partway, let it set up, then finish filling to minimize cracking. (If your paint pops out of the plastic pan, just re-wet the back of the mound of paint and press it back into place, or use a dot of gum arabic as "glue.")
Allow the paints to set up for at least 24 hours to several days, so they won’t travel when you take them out in the field.. Then when you’re ready to paint, simply spray or drip clean water on the pans for easily-lifted, intense color, as in the illustration above.
* If you'd like, take a peek at my Flickr set of watercolor boxes and palettes. Lots of ideas here, including my favorite Prang box re-hab, above! (I've refilled those pans 3-4 times since I shot those photos, and both my Prang palettes now have a few half pans for incidentals. They've traveled clear across country with me. I think using the same old metal palettes I had when I was a kid frees up something in my soul!)
And if you'd like to see a video on making your own palette boxes, it's here:


.JPG)