28 ARTISTS & JOURNALISTS
their work and words, interviews, blogs, images, hints, tips, websites
and more...

Showing posts with label Pam Johnson Brickell. Show all posts

Friday, August 22, 2014

Journaling as a Healing Tool

For all of you with furry friends..... Life with them is great, but as they age... well, the ending is always gut wrenching.

This is how it has been at our house for the last few months: vet trips, new meds, different food, pee trips in the wee hours of the morning.... I'm sure you've been there.

I've been sketching a lot of our two dogs over the last year.  Some with traditional tools, some on my iPad using Paper by 53.

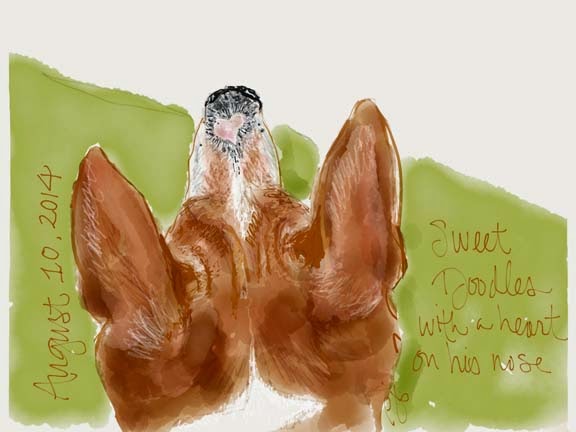
This past weekend the serious 'Goodbye' page started taking shape. One thing about our Dudley, he was all about showing you things you'd not have seen without him.  Sunday morning as he and I walked down the street at 5:15 a.m. was one of those instances.  This was the last Sunday we'd be together, and the early morning sky was just beautiful.  Later that day, I did the above memory sketch as a tribute to all those wee hour pee trip walks we've taken over the last several months.

Yesterday was our 'goodbye' day.  I came home and immediately went into my studio and studied the right blank side if the page.  I had decided on tribute phrase... but what else?  I knew I'd just have to take my time and the right things would come.  Later, we sat on the sofa and looked at old photos of our pups.  Oh that was fun and heart warming.  I found one portrait of Dudley that I wanted to put underneath the phrase.  Then, during a discussion with my husband, I said the words that are now on the bottom right corner.

You just never know what will find it's way to you for your page..... The journey of journaling - can't beat it!

As for our Sweet Dudley.... he's in a much better place, free of his earthly troubles.  Now all our loving is surrounding our Grizz to help her through the grief.... 15.5 years is a long time!
Main page: Stillman & Birn Alpha journal • watercolors • micron pen

Sunday, March 31, 2013

Inspired to Try....

A while back on FB, Jamie Williams Grossman posted about the book she was working in.  An 8 x 10 inch, 16 page book made from one sheet of watercolor paper!!!

Of course there were many questions in the comments about how????  Jamie was very sharing and gave the website address for the directions and also mentioned that it could be fashioned smaller using a half a sheet. It would be approximately  5 x 7 inches.  Now, that's my favorite working size.  I must do this!

Here is the link Jamie gave:

This is my 5 x 7 adaptation and below I've provided directions on making a basic book.  The sky is the limit for what you do with it :)
I painted the cover, page borders, splatters and marsh images with FW Acrylic Inks.

Please click to enlarge images.  This book has 16 paintable surfaces.

You'll want to use Fabriano 140# watercolor paper as it doesn't crack when folded. I tore my sheets so I could get an uneven edge. I use hot press as I like writing on the smooth surface.

Your book will be as precise as your folds.  Take your time and you'll be happy.  I practiced on  a 15" x 22" sheet of drawing paper.  I'm glad I did!

Happy journal making!


Wednesday, February 20, 2013

Correcting Lettering Mistakes

A lot of times I'll wait until I get home before adding lettering to a journal page. Mainly because of time and comfort. But on this particular day, I felt quite comfy perched on my camp stool and the 8.5 x 11 journal page in my Stillman and Birn Alpha hardbound journal was such a dream to work on.

However, on the way home, I began to wonder if this really was Harbour Town's Liberty Oak. There were two very large oaks in the heart of Harbour Town.  The magnificence of this tree, with it's sprawling low lying branches surely struck me as the one to bear this name...... Not!

Long ago, a skilled calligrapher taught me how to correct mistakes... Tip: correct your mistake before you lift any unwanted lettering.  Huh? Yes, write over the lettering on the page, then white out or lift off what you don't want.
That way the stroke of the corrected lettering will be smooth and you won't have to contend with the often bumpy texture left by white out or white ink.  I used a Signo Uniball broad tip white pen, available from JetPens.com.

I decided to turn Liberty Oak into Live Oak.  The RTY of Liberty would be taken out.  A good size space would be left between the two words.  I decided to put the tree's Latin name between Live and Oak.... a quirky fix, but it worked for me :)

Since this is a journal page and not a piece of calligraphic art, I was willing to live with a bumpy surface to write the smaller replacement text on.


Monday, January 21, 2013

Journal Page Tutorial

Last week, we had some unusually warm weather in the lowcountry of South Carolina.  We took advantage by taking our bikes to Pinckney Island National Wildlife Refuge. Our first stop was Nini Chapin Pond. It's roughly two miles from the parking area. There was not much bird activity, but we found some shade and it was a good time to eat our lunch.

This was the view we looked upon.  There was a small group of Buffleheads feeding in the water.  I loved how their dives caused the olive green water to shimmer with the blue of the sky.

Viewing the scene for a few minutes is a great way to narrow down what really catches my eye, helping me to decide  what to record in the journal.

The next page in my Stillman and Birn journal, that I've devoted to water scenes, was the right side of a spread.  I didn't want to fill the entire page with a sketch so decided upon a smaller vertical image.
Click to enlarge

The first thing I did was to secure a piece of foam core to the right side of the back of the journal.  This made a great surface to hold the palette and less of a balancing act for me.

Next, I drew the vertical shape that would hold the watercolor sketch. Then added pertinent information for the day: date, time, temperature, where we were, and around the edge of the box, I started adding notes about any wildlife that crossed our path.


To me, the lightest color in the scene was the blue of the sky and water.
I knew that if I let most of the paper show through on the lower right corner, I'd stand half a chance at keeping the true color to the foreground grasses.

click to enlarge


Hopefully you can see the first layer of blue!


 Now you can see the first layers of green water and the brown of the far shore's bank.  While painting, the Buffleheads were diving away, always changing what the water looked like.

When painting plein air, light and water are ever changing.  Once I've laid down the initial frame work of colors, I take a good look at the direction of the shadows. I will have to paint from memory in order to make the painting read true. 
All that was left to do was to add notes of any other wildlife that we saw after heading over to the other side of the pond.


Final page, scanned.....


Wednesday, December 26, 2012

New Workshop from Pam Johnson Brickell!


HI all!  I've added Pam's workshop to our page on Classes and Workshops in the tab at the top of the page, but I wanted to make sure you didn't miss it!  (And contributors, if you've got a new workshop, do let me know so I can add it!)

Illustrated Nature Journaling: Creating a Sense of Place

with

Pam Johnson Brickell

February 15 & 16 • 10:00 am – 3:30 pm • BYO Lunch

Coastal Art Supply

812 Port Republic Street • Beaufort, SC • 843-524-2787


Fee: $175

$75 deposit

Min/Max 5/8


Join Pam for classroom instruction in watercolor and pen sketching along with hand-lettering.  Put techniques learned into practice with plein air sketching around Port Royal’s Cypress Wetlands Trail.  Gain observation and eye/hand coordination skills, learn about nature and most of all, discover the joy of capturing the area, you choose to call home, in your heart and journal!  


Pam, a SC Master Naturalist, has an international following of her illustrated journals and is a contributing artist in Cathy Johnson's Artist Journal Workshop book, is a co-author of the book's companion blog, and an invited contributor of Johnson's Sketching in Nature blog.


Weather will dictate plein air sketching times.  Plan A: classroom sessions from 10 – noon daily, then we’ll drive to the town of Port Royal for afternoon sketching along the Cypress Wetlands Trail.  The trail is a half a mile in length and consists of pathways and boardwalks that are easily navigated and can be somewhat sheltered from the wind. 


Do dress accordingly.  Bring your sketchbooks and either a travel watercolor set or watercolor pencils, waterbrush(es), Micron pen, pencil and eraser.


We will eat lunch as we wrap up our classroom session.  Please BYO lunch/drink so we can be efficient with our time.  It will take 20 minutes or so to drive to Port Royal. 


Thursday, October 25, 2012

The Self Imposed Ink and Exercise Challenge

I'm trying out yet another Stillman and Birn Journal.... this time the Epsilon Series that has paper suited for pen and ink.

This is my first entry and I've got to say writing on this paper with a Micron pen is dreamy. The greys were created with grey and black Pentel Sign Pens that I hit the tip of with a waterbrush, then added the ink to the page.  The water/ink combo spread like butter.

One thing I really like about using a waterbrush is that it dispenses just enough water to get the job done.  This is very useful when the paper being used is not necessarily meant for washes.

This journal has two purposes. The first being to get me off of my desk chair and moving about. That's a challenge in itself as I get lost in my work and time goes sailing by. The second, and most fun, is to explore ink.

I'm glad the journal has many pages as there are so many inks waiting to be tried :) Which leads me to the back of my journal where I create color test pages......
click to enlarge
I'm keeping this journal in my desk drawer, easily at hand.  I've been sitting too long again... time to catch lunch and take a stroll with my journal and pens :)


Monday, September 3, 2012

New Tool For My Sketch Bag

Click to Enlarge
This page started off to feature the new addition to my plein air supplies, but then the page took on a life of its own :)  I pretty much had to squeeze everything else in!

Often, when painting the full moon, I get frustrated with the drying time of watercolors, especially in the summer months when the humidity and mosquitoes are fierce.  I just don't have the luxury of waiting for paint to dry and often have to finish the page upon returning home.

I've been looking for small fans that would fit in my bag, not weigh too much and have some decent reviews written about them.  The size of this little Coleman personal fan is perfect.  It's 4 inches tall, 1 3/8 inches wide and 3/4 deep. It weighs 4 oz. with 2 AA batteries inserted and puts out quite a breeze!  The reviews were mixed and averaged 3 out of 5 - 5 being excellent. I ordered it on Amazon and since there were already enough items in my cart to qualify for free shipping, I took a chance on the this ever so expensive (ha, ha) $5.27 fan!

Now for the opportunity to try it out!!

Sunday, July 29, 2012

First Entry On My iPad Sketch Journal


Found a neat app - Paper 53 - that lets me make journals and offers sketching tools that include a pencil, fountain pen, broad and thin markers, brush and eraser. Colors are limited but it's fun to figure out how to best use what's offered.

First I tried a stylus that has a rubber tip. No luck at all as response time was way off. My finger worked okay, but I couldn't see where my lines were going. My new stylus that has a felt-like tip, by Stylus-R-Us, was amazing.

Sure am enjoying the iPad :)

Pam Johnson Brickell
Posted using BlogPress from my iPad

Saturday, May 19, 2012

Fast Sketching and Building a Journal Page

Back in April, I conducted a small Around-the-Town Sketching Workshop in Beaufort, SC for Coastal Art Supply.

On the first day, we started by drawing boxes of various sizes on a page in our sketchbooks.  Then we headed outside with just our Micron pens, pencils and sketchbooks. 

My goals for the students included getting used to sketching quickly with pens, making color notes in pencil and in the end, completing their pages with color and decorative lettering.  We started filling the boxes with 30 second and 1 minute sketches.  Sometimes we splurged and stayed in one spot for 5 minutes.

After lunch we'd work in the studio and finish our morning sketches using watercolors or watercolor pencils.  Check out these results!


The second day, we approached our journal pages differently. We used multiple images to create  flowing vignettes on a single page.  I picked the subjects and showed them my methods of choosing where to position each item on the page.


This is my demonstration page.  The first item drawn was the metal palm tree sculpture on the right side of the page. I chose that spot because of the strong design of the fronds that pointed to the left - and into the center of my page.  The second element was the umbrella with the people.  Note that the shape of the umbrella points into the center of my page.  And the people are facing right, into the page. The third element was the cafe sign.  I made it a size to tie into what was already on my page.  The type was added back in the studio.  The page was screaming for a border.... type is perfect for that.

After lunch we hit the streets again with another page of boxes - they were a big hit and perfect for quick sketches.... And, what a flavor of Beaufort we captured!!


Here is the colorized version of my top b&w page:

If a blank journal page puts you off.... try a page of boxes.  They don't have to all be filled in the same day... perhaps one a day? They are perfect for the travel sketcher, or even keeping tract of your garden's growth.  The possibilities go on and on :)   Enjoy!  That's what it's all about :)

Wednesday, May 9, 2012

Recording a Favorite Event

I was a tad rusty as I hadn't sketched in weeks.      The theme for our local PGA golf tournament is 'Get Your Plaid On'.... This page was a great way to warm up and it made a fun back drop for golfer's autographs :)
The weather was outstanding and I got to spend the days sketching.  Oh so good to be back in the saddle again!!

The official start to the tournament.  I've sketched this golf course for 4 years now. Each year I get  braver and put more people onto my pages :)
click to enlarge


Day two's and three's sketches to come in a few days.

Wednesday, February 29, 2012

Happy Sadie Hawkins Day!

How did you spend this leap day? 

We finally had a day off when the weather was picture perfect :)  The Redbuds have been calling me and I knew I best take advantage and sketch one while they still had their flowers.  They started blooming early this year by about two weeks.  The leaves are already starting to pop on this little beauty.

Thursday, January 26, 2012

Earthshine

Best seen during Crescent Moon phases (the one to five day period before or after a New Moon), Earthshine is caused by direct sunlight on the earth that reflects onto the Moon which creates the smoky glow of the shadowed portion of the moon.

After sunset tonight, take a peek at the sky to see Venus, the Crescent Moon and Earthshine for your very own. Venus will be to the lower left tonight.  Happy viewing and hopefully journaling!!

Wednesday, December 14, 2011

Happy Waxing Moon

Don't you just love seeing a toothy grin up in the sky?

Friday, November 11, 2011

An 11.11.11 Thank You

Please click to enlarge


This shell will always have a special place on our bookshelves. It's a memento from my Dad's Basic Training days at Parris Island.

He wrote the date on the shell. I can see him walking the shoreline of Port Royal Sound and finding this treasure as he contemplated his next steps into WWII.

I've been wanting to preserve the shell as a journal sketch for the longest time. I can't think of a better day... a more special day than today... to honor it forever :)

Monday, October 24, 2011

Journal Box - Playing with Watercolor Ground

I've been wanting to try Daniel Smith's Watercolor Ground (DSWG) since it first came out.  My subject.... a cigar box :) 


It's all about repurposing, and now that the smell from the little devil's finally faded, I'm quite excited about the possibilities. Tip: if you have a cigar store in your town, check them out. They sell their boxes for very, very little... Our local store asked $1.00 for the cardboard boxes and $2.00 for the wood boxes!

I decided I liked the red cover on this box and chose to tape off the foil stamped illustration and used this area for application of the DSWG. 

Once applied, the DSWG has to cure for 24 to 72 hours before applying watercolor or acrylic.  It can also be thinned up to 10% with water.  You can see in my second image that the ground looks thin in some spots. My intuition was telling me to add a bit more to even out the first coat, but my adventurous side wanted to see if the uneven coating really mattered.  I had several cigar boxes that I applied the DSWG to.  My studio was filled with the essence of gesso..... it was a bit too strong from my nose.

 You can see in the upper and lower left corners where the ground was applied too thinly.  Could I make this work?

Well, yes and no. The lower left corner was a bit too thin and when you view the box in person you can tell.

Painting on the DSWG was similar to the feel of  painting on watercolor canvas. It was necessary to dry each application of paint with a hairdryer. Lifting paint is easy and I didn't see any wear on the surface.  Truth be told, my lifting was more like scrubbing.....

Almost done! I'll let this sit for a couple of days and no doubt tweak the image a bit more. The last step will be to spray it with Golden's MSA Archival Spray Varnish to seal the surface.
This will be home for my Garden Journal - a collection of single watercolor paper sheets... but more on that later :)

Saturday, September 3, 2011

New Fall Low Country Journaling Workshops

Autumn in the low country of South Carolina.... kiss the humidity goodbye and say hello to perfect Carolina blue skies and temperatures that will sooth your soul. Plan an Artful Autumn Get-Away and visit the delightful destination of Beaufort South, Carolina.


A Garden Journal Workshop with Pam Johnson Brickell
October 25, 26 and 27, 2011 • Beaufort, South Carolina
In conjunction with Coastal Art Supply and The Beaufort Inn


Pam is excited to join forces with Beaufort County's own Laura Lee Rose, a Clemson Extension horticulture agent and one of the area's foremost advocates of horticulture. She teaches the Master Gardener curriculum, oversees county-wide horticulture projects, speaks to schools and community groups, and has been active in organizing and promoting Beaufort's downtown community garden.

Learn sketching, page design, watercolor, lettering and artful journaling techniques from Pam and valuable plant identification/information and other horticultural goodies from Laura Lee.  

By the end of the workshop you'll experience the joys of keeping a garden journal and discover first hand how it can be utilized to plan your garden and serves as a record of your gardening trials and triumphs.

Oh yes..... lunch is provided by Southern Graces - the ultimate treat!

For information and registration call Coastal Art Supply at 843-524-2787

And.............


Pam just can't contain herself and must share the fun :)

Being offered at 
Coastal Art Supply in Beaufort, South Carolina
843-524-2787

Painting NightScapes Plein Air - The Hunter's Moon
November 8 − 10, 2011
Tues: 1 − 4 pm
Wed and Thurs 4:30 − 7:30 pm
For the workshop description, please click here

The Beaufort, SC link above has hotel and vacation rental options under the 'lodging' link.  


No matter which part of the these wonderful United States you want to head off to for an Artful Autumn Get-Away.... or if you would like to try an online workshop, there are plenty to choose from. Check out the complete listings on this blog here.


Thursday, August 25, 2011

The Making of a Page

Just because a sketch is made in the spring doesn't mean the page gets finished then :)  I got caught up in some research about May Day...

There was a lot of room left on the paper when I finished my plein air pen and watercolor sketch. And, since it was May Day and the sketch of Sparkleberry... Well you know, just that tree's name on my tongue makes calligraphic notes sing in my head! I decided to settle into a more controlled environment to finish the dressing on this May Day page.


A tissue paper overlay is a great way to experiment with the placement of other elements you want to add to your page. It keeps the paper from being compromised from too much erasing.

The trick is matching the same placement that you like on the overlay. There are transfer papers you can use, or you can flip over the overlay and trace what's on the front side using a very soft pencil. Once finished, flip it back to the original side,lay it over your journal page and retrace your original lines with a sharp pencil. Lift the overlay tissue off of your journal page and your lettering will/should be on the paper beneath.


But, I know from experience that I lose total spontaneity when I use these methods. My lines become stiff as I get caught up in left brain control. I honor my free flowing plein air sketch too much to let that happen. I want all the elements to compliment that freedom. So I guess-ti-mate :)

My version of cooking without a recipe :)

Click on images to enlarge :)

Sunday, August 14, 2011

Journaling on 'Whitelines' Paper

We picked a great day to go to the beach on Hilton Head Island, SC.  Instead of a mid-week visit, we chose Saturday.... the day of check out/check in for vacationers. While everyone else was stuck in traffic on Route 278, we and a decent amount of people were enjoying a beautiful day at the beach :)

On the technical side...
I made this journal entry in a new journal by WHITELINES. This is a Swedish company that makes a toned paper using white for lines. They also offer paper with grids (squared), isometric lined notepads and perspective lined notepads. There are many choices of binding: hard covered spiral, soft covered flexible and glued pads.

The paper has a nice feel. I estimate it to be about 24# in weight. I've been using Pentel energel and Signo uniball ballpoint pens on it and have experienced no smudging. The ink in these pens is water soluble. Micron pens remain waterproof on it's surface.

I used watercolor pencils on the page above with minimal water using a Niji waterbrush. The paper did buckle but, that was no surprise. I think colored pencils would really work well on this surface, perhaps even pan pastels. When you turn the page over you can see a little bleed through, but not nearly as much as you do with Moleskine's regular journal paper.

WHITELINES claims that when pages are copied or scanned the white lines and toned background will disappear.
Click to enlarge
As you can see above, that was not the case when I scanned the page at my scanners normal settings. I had to lighten the overall exposure of the original scan, lost some subtle tones, but the page on the right is a lot cleaner looking.

I do like how the ink really stands out on the paper. And the toned surface is easier on your eyes versus looking at dark lines on a white surface. I liked working on a paper with grids. My type lines remained square to the page :)

Overall, I like the paper for the written word. Perhaps next time I choose to add an illustration I'll test colored pencils...

Related Posts Plugin for WordPress, Blogger...